🪔 HTML
HTML=> Hyper Text Markup Language
CSS=> Cascading Style Sheets
JS => JavaScript
First Step:-
- Download visual code studio.
- In VS- code check extension and install Live server.
- Check Terminal and select default (powershell).
- Press exclamatory sign to write basic code of HTML.
Where green code is comment code ....
Second Step:-
Head, Meta, Title, Body ---- TAGS
Charset ----ATTRIBUTE
Basically meta is used for SEO.
So meta user is use meta because it helps in your website rank.
In meta tags→
- First tag is used for content width and height which includes in your device.
- Second tag is used for content width and height expect old internet browser.
- Third tag is used for content description.
- Forth tag is used for keywords. It helps in search engines.
- Fifth tag is used for shown or invisible your website in search engines.
This image is upload for check commands in html.
In above picture mentioned that the headlines always put in the body tag.
How many types of headlines are there --- only 6 types of headlines
-H1,H2,H3,H4,H5,H6
and paragraphs also put in body tag ..
VS code have special feature
LOREM 23 For dummy text with 23 words.
In old time <b> tag used for bold text and <i> tag used for italic text but now <storng> tag used for bold and <em> tag used for italic..
For break use <br> tag ...
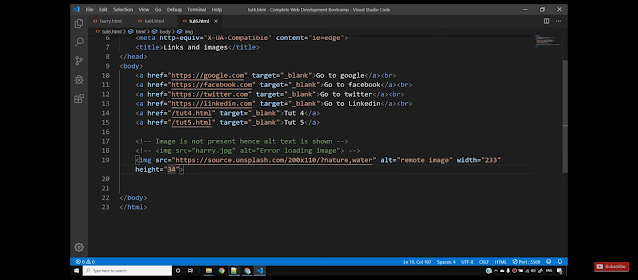
In above picture mentioned that the anchor tag is always use in body tag and uses for write any website....
For image <img> tag
Image is not present hence alt text is shown...
<!DOCTYPE html>
<html lang="en">
<head>
<meta charset="UTF-8">
<meta name="viewport" content="width=device-width, initial-scale=1.0">
<meta http-equiv="X-UA-Compatible" content="ie=edge">
<title>Forms</title>
</head>
<body>
<h2>This is HTML forms tutorial</h2>
<form action="backend.php">
<label for="name"> Name</label>
<div>
<input type="text" name="myName" id="name">
</div>
<br>
<div>
Role: <input type="text" name="myRole">
</div>
<br>
<div>
Email: <input type="email" name="myEmail">
</div>
<br>
<div>
Date: <input type="date" name="myDate">
</div>
<br>
<div>
Bonus: <input type="number" name="myBonus">
</div>
<br>
<div>
Are you eligible?: <input type="checkbox" name="myEligibility" checked>
</div>
<br>
<div>
Gender: Male <input type="radio" name="myGender"> Female <input type="radio" name="myGender">
Other <input type="radio" name="myGender">
</div>
<br>
<div>
Write about yourself: <br><textarea name="myText" cols="90" rows="10"></textarea>
</div>
<br>
<div>
<label for="car">Car</label>
<select name="myCar" id="car">
<option value="ind">Indica</option>
<option value="swf" selected>Swift</option>
</select>
</div>
<br>
<div>
<input type="submit" value="Submit Now">
<input type="reset" value="Reset Now">
</div>
</form>
</body>
</html>
For form details.....
Forth step:-
Select and press ctrl+/ to comment
And . is for class and # is for I'd...
That's end this topic ....
See you next time 🙂🙂


0 comments